作者:楊德倫 / 臺灣大學計算機及資訊網路中心教學研究組幹事
Sphinx是一個開放原始碼(Open Source)的搜尋引擎伺服器,並且可在 Linux、Windows、MacOS、Solaris、FreeBSD…等作業系統上運作,其主要設計在於提供使用者/用戶端「全文檢索(full-text)」的功能,同時可以結合PHP、Java、Python等程式語言,以及MySQL、MariaDB、Postgre、MSSQL、兼容ODBC的資料庫管理系統,並提供相關API,讓開發人員能夠直接操作與運用,非常方便。
前言
建置資料庫及資料表時,我們必須注意到哪些查詢結果,需要建立索引(Index),以便於未來針對同一查詢時,可以節省資源,並提高效能。但在專案不斷進行修正時,若無法針對查詢結果的索引進行修改或新增,隨著資料量的增加,錯誤的索引,將會造成空間的浪費,以及不必要的資源耗損。有鑑於此,我們可以透過Sphinx Search Engine Server,將原先資料庫查詢責任,交給Sphinx來處理。Sphinx可以設定T-SQL語法,將資料庫(本案例使用 MySQL)的資料,建立成Sphinx專用的索引,並透過SphinxAPI來進行資料檢索與查詢,速度比傳統資料庫管理系統快上許多,不但能節省資料庫資源,還能將查詢功能獨立出來管理,實用又便利。
安裝 Apache Web Server
http://www.cc.ntu.edu.tw/chinese/epaper/0033/20150620_3308.html)一文當中,解釋如何安裝 Apache Web Server,在此就不贅述了,請自行參閱。
安裝 PHP 5
一、安裝 libxml2
http://xmlsoft.org/sources/libxml2-2.9.2.tar.gz
說明:
$ sudo ./configure
--prefix=/usr/local/libxml2
二、安裝 libiconv
http://ftp.gnu.org/pub/gnu/libiconv/libiconv-1.14.tar.gz
說明:
原則上執行下列指令
$ sudo ./configure
--prefix=/usr/local/libiconv
--enable-shared
--enable-static
若是 stdio.c 有錯誤,且跟 gets 有關
請至 /usr/local/src/php/libiconv/srclib/stdio.in.h 當中
尋找 _GL_WARN_ON_USE (gets, "gets is a security hole - use fgets instead");
然後在其上方加上一段
#if defined(__GLIBC__) && !defined(__UCLIBC__) && !__GLIBC_PREREQ(2, 16)
最後在 _GL_WARN_ON_USE (gets, "gets is a security hole - use fgets instead");下方再多加個 #endif
最後再重新編譯一次(按照原則上執行的指令再跑一次)
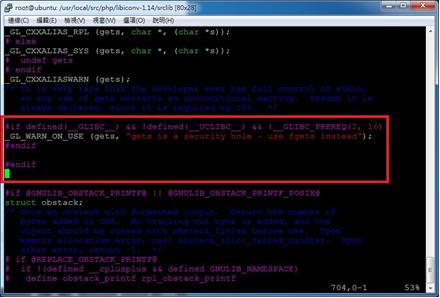
圖一 錯誤修正方式
三、安裝 libmcrypt
http://nchc.dl.sourceforge.net/project/mcrypt/Libmcrypt/2.5.8/libmcrypt-2.5.8.tar.gz
說明:
$ sudo ./configure
--prefix=/usr/local/libmcrypt
--enable-shared
--enable-static
四、安裝 libssh2
http://www.libssh2.org/download/libssh2-1.4.3.tar.gz
說明:
$ sudo ./configure
--prefix=/usr/local/libssh2
--with-libssl-prefix=/usr/local/openssl
五、安裝 curl
http://curl.haxx.se/download/curl-7.40.0.tar.gz
說明:
$ sudo ./configure
--prefix=/usr/local/curl
--with-ssl=/usr/local/openssl
--with-zlib=/usr/local/zlib
--with-libssh2=/usr/local/libssh2
六、安裝 jpeg
http://www.ijg.org/files/jpegsrc.v9a.tar.gz
說明:
$ sudo ./configure
--prefix=/usr/local/jpeg-9
--enable-shared
--enable-static
七、安裝 libpng
http://jaist.dl.sourceforge.net/project/libpng/libpng16/1.6.16/libpng-1.6.16.tar.gz
說明:
先回到 zlib 原先安裝的資料夾(原先由 tarball 包解開來),再執行
$ sudo make clean
$ sudo ./configure
(不需要 --prefix)
$ sudo make
$ sudo make install
然後再回 libpng 資料夾執行
$ sudo ./configure
--prefix=/usr/local/libpng
--with-zlib-prefix=/usr/local/zlib/
--enable-shared
--enable-static
八、安裝 freetype
http://download.savannah.gnu.org/releases/freetype/freetype-2.5.5.tar.gz
說明:
1. 安裝 freetype 前,一定要先安裝 libpng;前者依賴後者。
2. 若找不到 libpng-config:
至 /usr/local/libpng/bin,sudo cp libpng-config(此為軟連結)到 /usr/bin
3.
$ sudo ./configure
--prefix=/usr/local/freetype
--enable-shared
--enable-static
九、安裝 gd
https://bitbucket.org/libgd/gd-libgd/downloads/libgd-2.1.1.tar.gz
說明:
$ sudo ./configure
--prefix=/usr/local/libgd
--with-libiconv-prefix=/usr/local/libiconv
--with-zlib=/usr/local/zlib
--with-freetype=/usr/local/freetype
--with-jpeg=/usr/local/jpeg-9
--with-png=/usr/local/libpng
--enable-shared
--enable-static
十、安裝 PHP 5
http://php.net/distributions/php-5.6.4.tar.gz
$ sudo ./configure
--prefix=/usr/local/php5
--with-apxs2=/usr/local/apache2/bin/apxs
--with-iconv-dir=/usr/local/libiconv
--with-pcre-regex=/usr/local/pcre
--with-pcre-dir
--with-freetype-dir=/usr/local/freetype
--with-jpeg-dir=/usr/local/jpeg-9
--with-png-dir=/usr/local/libpng
--with-zlib=/usr/local/zlib
--with-zlib-dir=/usr/local/zlib
--with-libxml-dir=/usr/local/libxml2
--with-curl=/usr/local/curl
--with-mcrypt=/usr/local/libmcrypt
--with-openssl=/usr/local/openssl
--with-openssl-dir=/usr/local/openssl
--with-xmlrpc
--with-mysql
--with-mysqli
--with-gettext
--with-gd
--with-pdo-mysql
--enable-zip
--enable-calendar
--enable-bcmath
--enable-xml
--enable-mbstring
--enable-ftp
--enable-gd-native-ttf
--enable-sockets
--enable-soap
--enable-session
--enable-shared
--enable-static
備註:
1. 至 /usr/local/apache2/conf/httpd.conf ;
<IfModule mime_module>
.
.
Addtype application/x-httpd-php .php .phtml
.
.
</IfModule>
2. 至 php-5.x.x 解開後之資料夾,尋找 php.ini-development
$ sudo cp php.ini-development /usr/local/php5/lib/php.ini
3.
<IfModule dir_module>
DirectoryIndex index.php index.html
</IfModule>
十一、ssh 安裝方式(非必要)
http://pecl.php.net/get/ssh2-0.12.tgz
說明:
1. 先確認有無安裝 autoconf 套件
在 /usr/local/src/當中的ssh2資料夾裡頭,
執行 phpize(指令:/usr/local/php5/bin/phpize)
此時會出現 configure 等檔案,
再進行下列安裝指令:
$ sudo ./configure --prefix=/usr/local/ssh2
--with-ssh2=/usr/local/libssh2
--with-php-config=/usr/local/php5/bin/php-config
--enable-shared
--enable-static
2. 看看是否存在 ssh2.so 檔案
(到 /usr/local/php5/lib/php/extensions/)

圖二 確定 ssh2.so 存在與否
3. 移動至 /usr/local/php5/lib/php.ini,
到 Dynamic Extensions 區塊底下,任一地方加入extension = ssh2.so
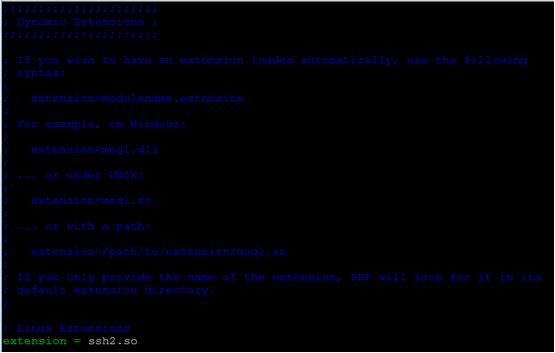
圖三 引入 ssh2.so 檔
4. 再至有 phpinfo() 函式的網頁,查看有無下面圖示的結果
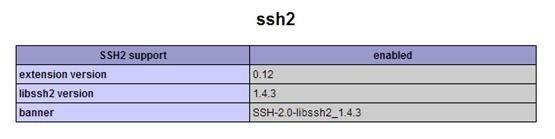
圖四 確認 ssh2 是否可以使用
安裝 MySQL
一、下載 MySQL community server 版本
說明:
請選擇「Linux – Generic」,然後視主機支援程度選擇「TAR Archive」,再將最下方的「No thanks, just start my download.」文字網址連結複製下來,貼在 linux 系統中來透過 wget 下載。
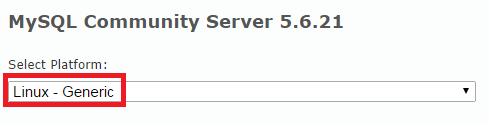
圖五 選擇平台

圖六 以 tar 包來進行安裝
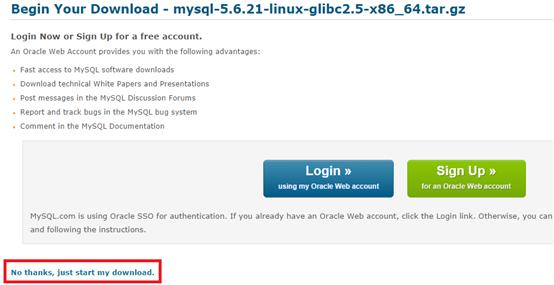
圖七 複製「No, thanks ….」連結,並在 Linux 底下進行下載
備註:假設使用者下載檔案後,放置於 /usr/local/src/
$> cd /usr/local/src/
$> sudo wget http://cdn.mysql.com/Downloads/MySQL-5.6/mysql-5.6.22-linux-glibc2.5-x86_64.tar.gz
$> tar -xzvf mysql-5.6.21-linux-glibc2.5-x86_64.tar.gz
二、將解壓縮的 mysql 資料夾放到 /usr/local/
$> mv mysql-5.6.21-linux-glibc2.5-x86_64 /usr/local/mysql
三、安裝相關函式庫(如果沒有的話)
$> sudo apt-get install libaio1
四、新增群組、帳號
$> groupadd mysql
$> useradd -s /sbin/nologin -g mysql mysql
五、複製 mysql 啟動腳本檔案到 /etc/init.d/
$> cd /usr/local/mysql/support-files/
$> cp mysql.server /etc/init.d/mysql
$> sudo chmod +x /etc/init.d/mysql
*非必要選項(Optional):
若要讓 mysql 自動開機啟動則可輸入下列指令
$> sudo update-rc.d mysql defaults
六、改變 mysql 資料夾權限,讓 mysql 帳號可以進行存取
$> cd /usr/local/mysql
$> sudo chown -R mysql:mysql ./data
七、執行 mysql 的安裝指令,並加入一些參數,成為預設值
$> sudo ./scripts/mysql_install_db
--user=mysql
--basedir=/usr/local/mysql
--datadir=/usr/local/mysql/data
八、開啟 mysql 服務
$> sudo ./bin/mysqld_safe --user=mysql &
九、啟動 mysql
$> sudo /etc/init.d/mysql start
十、查詢 mysql 開啟後的程序列表
$> sudo ps -aux | grep mysql
呈現如下結果
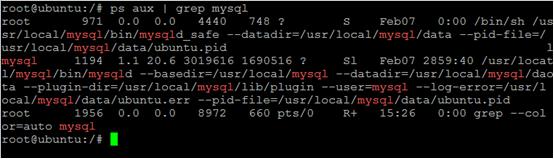
圖八 查詢是否啟動服務
十一、顯示版本
$> sudo ./bin/mysqladmin version
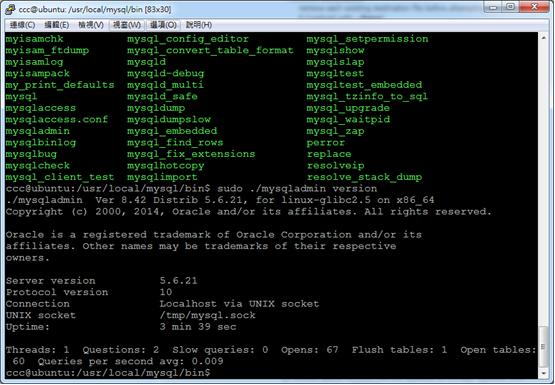
圖九 MySQL 版本查詢
十二、顯示 mysql 系統變數
$> sudo ./bin/mysqladmin variables
十三、將服務關掉再開,測試 mysql 安裝過程是否正確
$> sudo ./bin/mysqladmin -u root shutdown
$> sudo ./bin/mysqld_safe --user=mysql &
十四、關閉 mysql 後再開啟
$> sudo /etc/init.d/mysql stop
$> sudo /etc/init.d/mysql start
十五、設定 mysql 的 root 密碼(與 linux 的 root 不同)
$> sudo ./mysqladmin -u root password "newpassword"
十六、登入 mysql 的指令介面
$> sudo ./bin/mysql -u root -p
十七、新增一名使用者,並賦予一定權限
mysql> CREATE USER 'new-user-name'@'%' IDENTIFIED BY 'new-user-password';
GRANT ALL PRIVILEGES ON * . * TO 'new-user-name'@'%' IDENTIFIED BY 'new-user-password' WITH GRANT OPTION MAX_QUERIES_PER_HOUR 0 MAX_CONNECTIONS_PER_HOUR 0 MAX_UPDATES_PER_HOUR 0 MAX_USER_CONNECTIONS 0;
十八、下載 phpMyAdmin,並設定 config.inc.php 檔
說明:
phpMyAdmin是一種網頁介面的資料庫管理工具(網頁伺服器需要能夠執行PHP)。此步驟可有可無,若有安裝網頁伺服器,可考慮一同建置。另外,請放置該工具資料夾於網頁根目錄下,方便使用與測試。
$i++
/* Authentication type */
$cfg['Servers'][$i]['auth_type'] = 'cookie';
/* Server parameters */
$cfg['Servers'][$i]['host'] = 'MySQL 伺服器的 IP或本機 localhost';
$cfg['Servers'][$i]['connect_type'] = 'tcp';
$cfg['Servers'][$i]['compress'] = false;
/* Select mysql if your server does not have mysqli */
$cfg['Servers'][$i]['extension'] = 'mysqli';
$cfg['Servers'][$i]['AllowNoPassword'] = false;
* 備註:
由於 MySQL 的使用,在網路上已有許多文件,在此僅提供安裝方式,使用方式請於網路上尋找與學習。
安裝Sphinx
一、安裝 sphinx
http://sphinxsearch.com/files/sphinx-2.2.7-release.tar.gz
$ sudo tar -zxvf sphinx-2.2.7-release.tar.gz
$ sudo ./configure
--prefix=/usr/local/sphinx
--with-mysql=/usr/local/mysql
$ sudo make
$ sudo make install
二、安裝libsphinxclient
說明:到sphinx-2.2.7資料夾當中,進入api資料夾,找尋libsphinxclient資料夾
$ cd /usr/local/src/sphinx-2.2.7-release/api/libsphinxclient
$ sudo ./configure
$ sudo make
$ sudo make install
三、安裝 sphinx client for PHP(sphinx.so檔)
http://pecl.php.net/get/sphinx
說明:讓 php 支援 Sphinx 套件
$ sudo tar -zxvf sphinx-1.3.2.tgz
$ cd sphinx-1.3.2
$ sudo /usr/local/php5/bin/phpize

圖十 擴展 sphinx 套件(產生 configure 文件)
此時會出現 sphinx client 的相關 configure 檔案

圖十一 看到可編輯的檔案
再進行安裝
$ sudo ./configure
--prefix=/usr/local/sphinx
--with-sphinx
--with-php-config=/usr/local/php5/bin/php-config
--enable-static
--enable-shared
$ sudo make
$ sudo make install
成功後,會出現下列訊息
Installing shared extensions: /usr/local/php5/lib/php/extensions/no-debug-zts-20131226/
我們再到 php.ini 裡面加入 extension = phinx.so(先前有加入 ssh2.so 過)

圖十二 加入 sphinx.so 檔到 php.ini
再來透過 phpinfo() 來檢查是否支援 Sphinx api for php

圖十三 確定 PHP 有支援 sphinx
* 備註:若是出現 configure: error: Cannot find libsphinxclient headers
請下載 http://sphinxsearch.com/files/sphinx-2.2.7-release.tar.gz
解壓縮後,再到 sphinx-2.2.7 資料夾當中,進入 api資料夾,至 libsphinxclient資料夾,進行如同 二、 的步驟安裝。有時候我們只是想在 PHP 上掛.sphinx.so,讓 php 支援,而非架設整個 sphinx 伺服器。
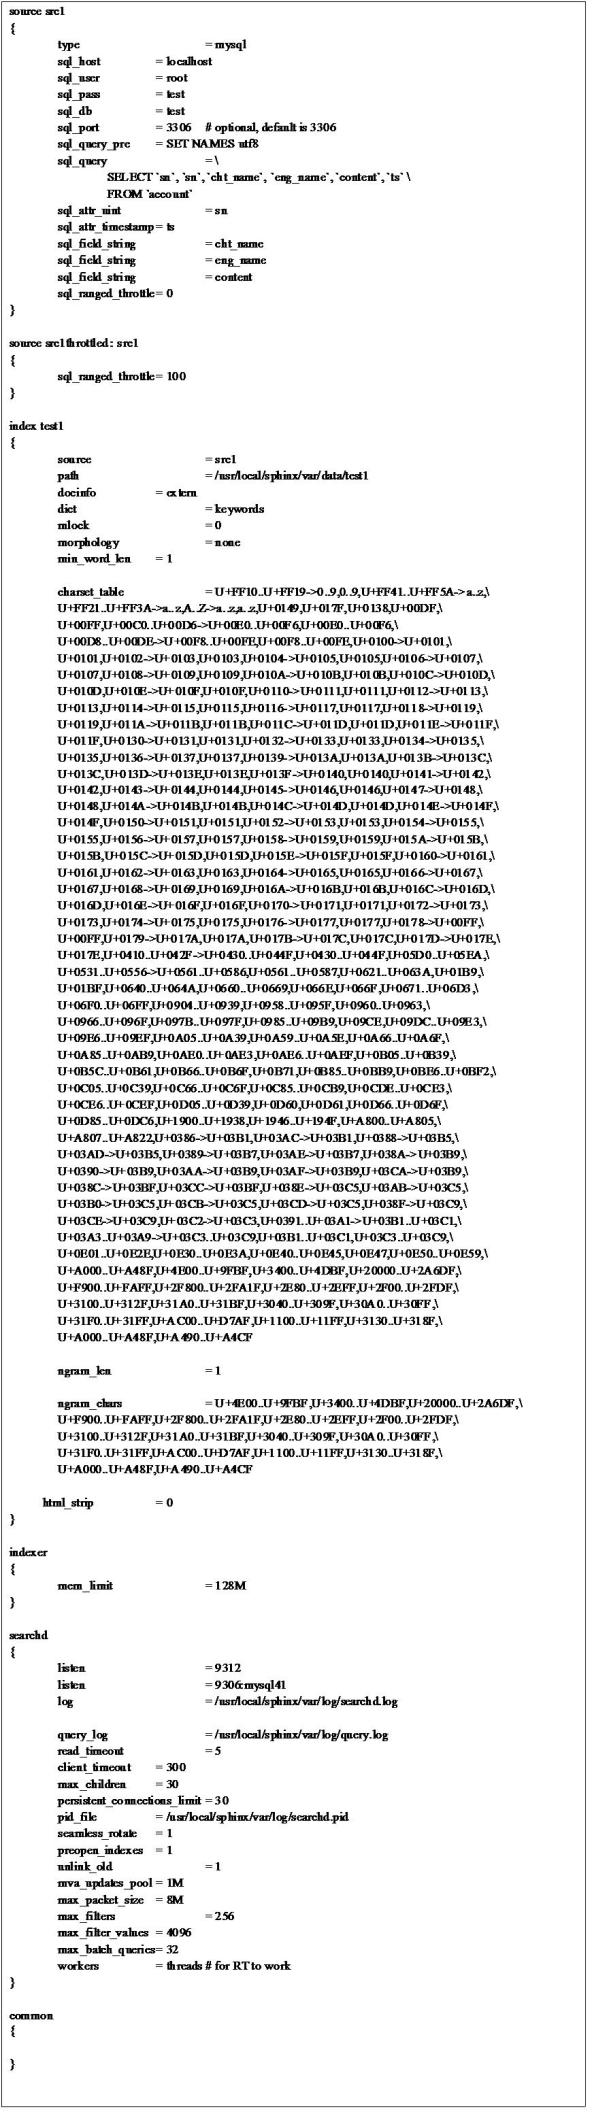
四、設定 sphinx.conf 檔
先將 /usr/local/sphinx/etc/sphinx.conf.dist 複製到 /usr/local/sphinx 底下
$ sudo cp /usr/local/sphinx/etc/sphinx.conf.dist /usr/local/sphinx
再重新命名為 sphinx.conf
$sudo mv /usr/local/sphinx/sphinx.conf.dist /usr/local/sphinx/sphinx.conf
內容的設定,原則上以修正兩個部分為主,一個是 src,一個是 index,基本結構如下:
source 來源名稱1{
#資料來源設定
}
index 索引名稱1{
#索引設定
source = 來源名稱1
}
source 來源名稱2{
#資料來源設定
}
index 索引名稱2{
#索引設定
source = 來源名稱2
}
indexer{
# indexer 配置
}
searchd{
# searchd 配置
}
參考配置如下:
啟動 & 使用 Sphinx
一、筆者常用測試指令
$ sudo /usr/local/sphinx/bin/searchd --stop;
(關閉 Sphinx)
$ sudo rm /usr/local/sphinx/var/data/*; sudo rm /usr/local/sphinx/var/log/*;
(刪除先前建立的索引及日誌)
$ sudo /usr/local/sphinx/bin/indexer --all;
(建立所有索引;我們也可以開啟特定 index,例如設定檔中的 test1)
$ sudo /usr/local/sphinx/bin/searchd;
(啟動 Sphinx)
$ sudo /usr/local/sphinx/bin/indexer --rotate --all;
(動態更新索引將尚未建立索引的 MySQL 資料匯入;要先啟動 Sphinx)
二、防止啟動 searchd 時出錯的措施
說明:
如果出現類似以下的訊息
/usr/local/sphinx/bin/indexer:error while loading shared libraries:libmysqlclient.so.18 cannot open shared object file: No such file or directory
請執行下面的指令
$ sudo ln -s /usr/local/mysql/lib/libmysqlclient.so.18 /usr/lib/libmysqlclient.so.18
三、資料庫參考
說明:我們要檢索的部分為 cht_name, eng_name, content
1. 結構

圖十四 資料表結構
2. cht_name 是中文名稱,eng_name 是英文名稱,content 是自訂內容
四、啟動 sphinx
說明:
1. 針對 test1 索引
/usr/local/bin/indexer test1
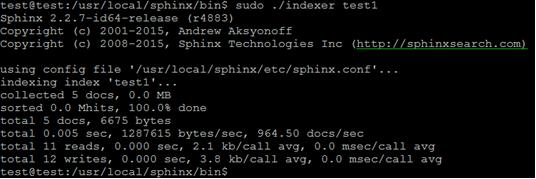
圖十五 建立索引
2. 啟動 searchd
/usr/local/sphinx/bin/searchd -i test1
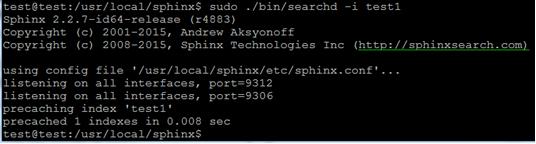
圖十六 啟動 Sphinx 服務
五、測試全文檢索機制可否運作
說明:
請建立一 php 檔,寫入下列程式碼
<?php
$s = new SphinxClient;
$s->setServer("localhost", 9312);
//搜尋伺服器模式,之後會介紹
$s->setMatchMode(SPH_MATCH_ALL);
$s->setMaxQueryTime(60);
$result = $s->query("網球");
echo "<pre>";
print_r($result);
echo "</pre>";
?>
而後將有相關陣列資訊呈現,便成功了

最後,就看各位對 PHP 的熟悉程度,來對 Array 進行解析與運用。
Sphinx 搜尋模式簡介
目前可以將搜尋伺服器的模式,簡化成四種。
第一種模式(SPH_MATCH_ALL),
對所有文字進行查詢,
查詢文字的先後可以不同,前後順序不影響權重,
同時文字越多,查詢結果就會愈少。
第二種模式(SPH_MATCH_ANY),
只要符合其中一個文字就會被查詢,
查詢文字的先後可以不同,符合前後順序的權重愈高,
同時文字越多,查詢結果就會越多。(不推薦)
第三種模式(SPH_MATCH_PHRASE),
對所有文字進行查詢,
查詢文字的先後不能不同,順序不同不會出現在結果裡,
算是一種精準的查詢,類似 SQL Like 的語法,只是必須按照順序才會被撈出。
第四種模式(SPH_MATCH_EXTENDED2),
對所有文字進行查詢,
查詢文字的先後可以不同,符合前後順序的權重愈高,
同時文字越多,查詢結果就會越少。
(跟第一種模式很像,差異在於權重計算方式)
後記
現行有許多專案,透過Sphinx來建立查詢機制,同時也支援PHP、Java、Python等程式語言,以及MySQL、MariaDB、Postgre、MSSQL、兼容 ODBC 的資料庫管理系統,並且可在Linux、Windows、MacOS、Solaris、FreeBSD…等作業系統上運作,對入門、進階的開發者而言,不失為一套簡易又便利的全文檢索伺服器。
參考資料
[1] Sphinx (search engine) from Wikipedia
https://en.wikipedia.org/wiki/Sphinx_(search_engine)
[2] Sphinx 官方網站
http://sphinxsearch.com/
[3] Jax 的工作紀錄:MySQL 全文檢索引擎 - Sphinx
http://jax-work-archive.blogspot.tw/2009/05/mysql-sphinx.html#sphinx_conf_deploy